Tracking Progress in Apps in Real Time Using Interim Process Result
Overview
To better understand how interim process results work, you can build the example described on this page.
By following this procedure, you will build a process in Studio that involves sending intermediate data to UiPath Apps using the Send Interim Result activity. You will build an app that will display a progress bar (using Slider control) in real-time as the tables are populated with data.
For this example we will build the following:
- An automation process
- An app using UiPath Apps
Tutorial
Building the process
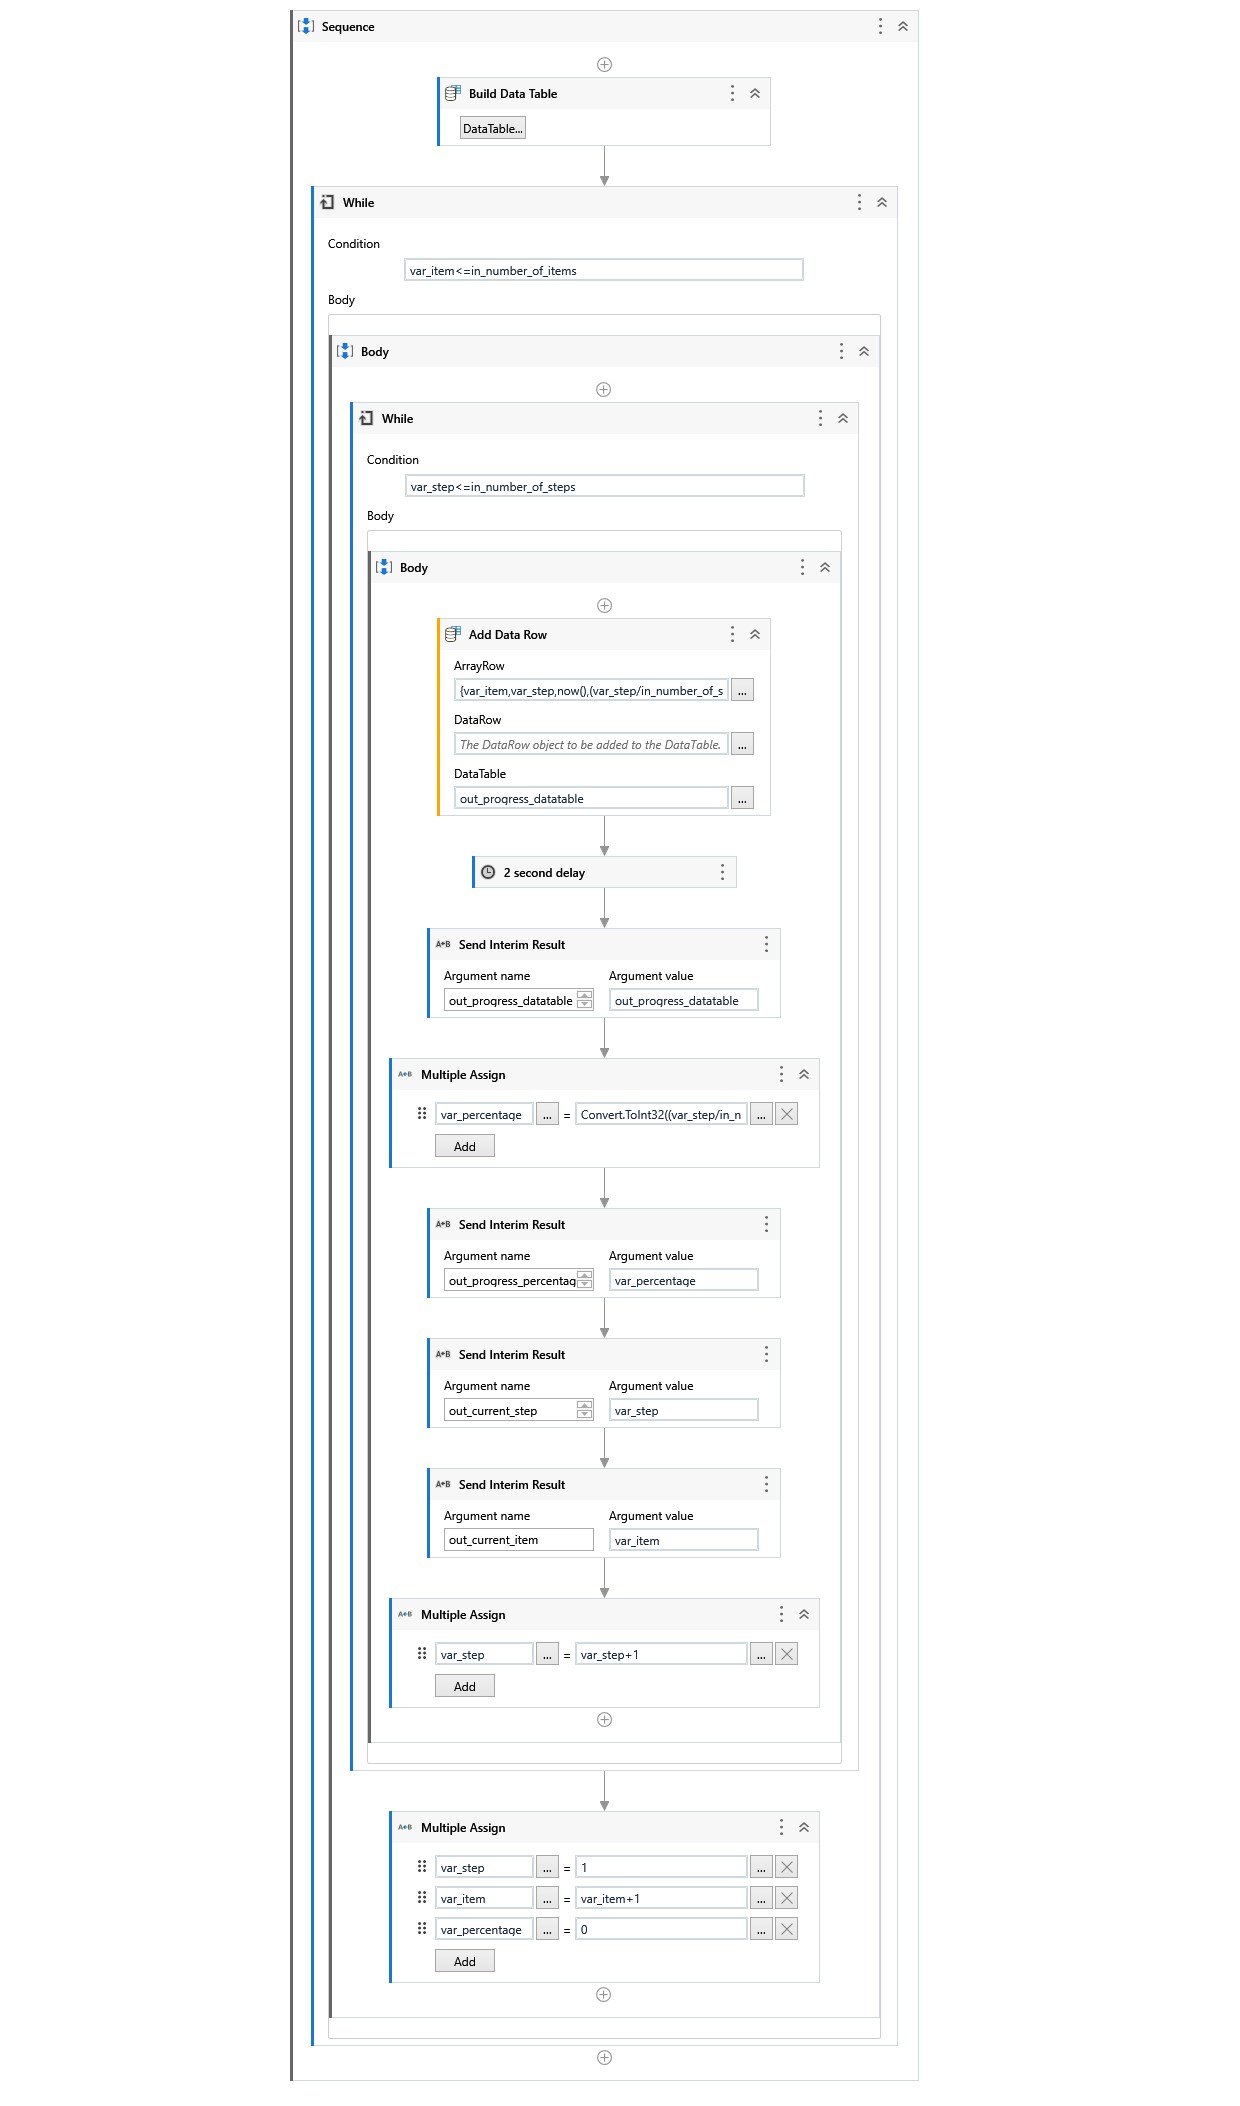
The process from this tutorial is used to demonstrate the capabilities of the Interim Process Result activity. The process takes two inputs:
- The number of items to process.
- The number of steps in each item.
The process runs with these inputs and sends the following interim results to the app:
- The current item being executed by the process.
- The current step in the item.
- The progress percentage for the specific item.
- A table populating each step, including a timestamp.
-
Open Studio and create a new Process.
-
Create the following arguments:
Argument name Direction Argument type Default value in_number_of_stepsIn Int32 3 in_number_of_itemsIn Int32 2 out_progress_percentageOut Int32 - out_progress_datatableOut DataTable - out_current_stepOut Int32 - out_current_itemOut Int32 - -
Drag a Sequence to the Workflow Designer.
-
Create the following variables:
Variable name Variable type Default value var_itemInt32 1 var_stepInt32 1 var_percentageInt32 0
-
-
Add a Build Data Table activity inside the Sequence container.
- Add the
out_progress_datatableargument in the DataTable field. - Add four columns to the table:
- Item Number as
Int32. - Step Number as
Int32. - Time as
DateTime. - Progress % as
Int32.
- Item Number as
- Add a While activity below the Build Data Table activity and configure it as below:
- Add the
-
Add
var_item<=in_number_of_itemsin the Condition field.- Add a While activity in the Body.
- Add
var_step<=in_number_of_stepsin the Condition field. - Add an Add Data Row activity in the Body.
- Add
{var_item,var_step,now(),(var_step/in_number_of_steps)* 100}in the ArrayRow field. - Add
out_progress_datatablein the DataTable field.
- Add a Delay activity below Add Data Row. Add
00:00:02in the Duration field (2 second). - Add a Send Interim Result activity below Delay.
- Add
out_progress_datatablein the Argument name field andout_progress_datatablein the Argument value field.
- Add a Multiple Assign activity below Send Interim Result.
- Add
var_percentagein the To field andConvert.ToInt32((var_step/in_number_of_steps) * 100)in the Value field.
- Add a Send Interim Result activity below Multiple Assign.
- Add
out_progress_percentagein the Argument name field andvar_percentagein the Argument value field.
- Add a second Send Interim Result activity before the previous one.
- Add
out_current_stepin the Argument name field andvar_stepin the Argument value field.
- Add a third Send Interim Result activity.
- Add
out_current_itemin the Argument name field andvar_itemin the Argument value field.
- Add a Multiple Assign activity below the last Send Interim Result activity.
- Add
var_stepin the To field andvar_step+1in the Value field.
- Add a Multiple Assign activity below the last While.
- Add
var_stepin the To field and1in the Value field. - Add
var_itemin the To field andvar_item+1in the Value field. - Add
var_percentagein the To field and1in the Value field.
- Add
- Add a While activity in the Body.
Result
In the end, your workflow should look similar to the one below.
Building the app
The app from this tutorial receives information from the process built before. The app displays the following interim results received from the process:
- The current item being executed by the process.
- The current step in the item.
- The progress percentage for the specific item.
- A table populating each step, including a timestamp.
Before you start building your app, make sure that the automation process from the Building the process section is created and published in your Orchestrator.
-
Open your already existing application or start a new one.
-
Reference the process from the Prerequisites section.
-
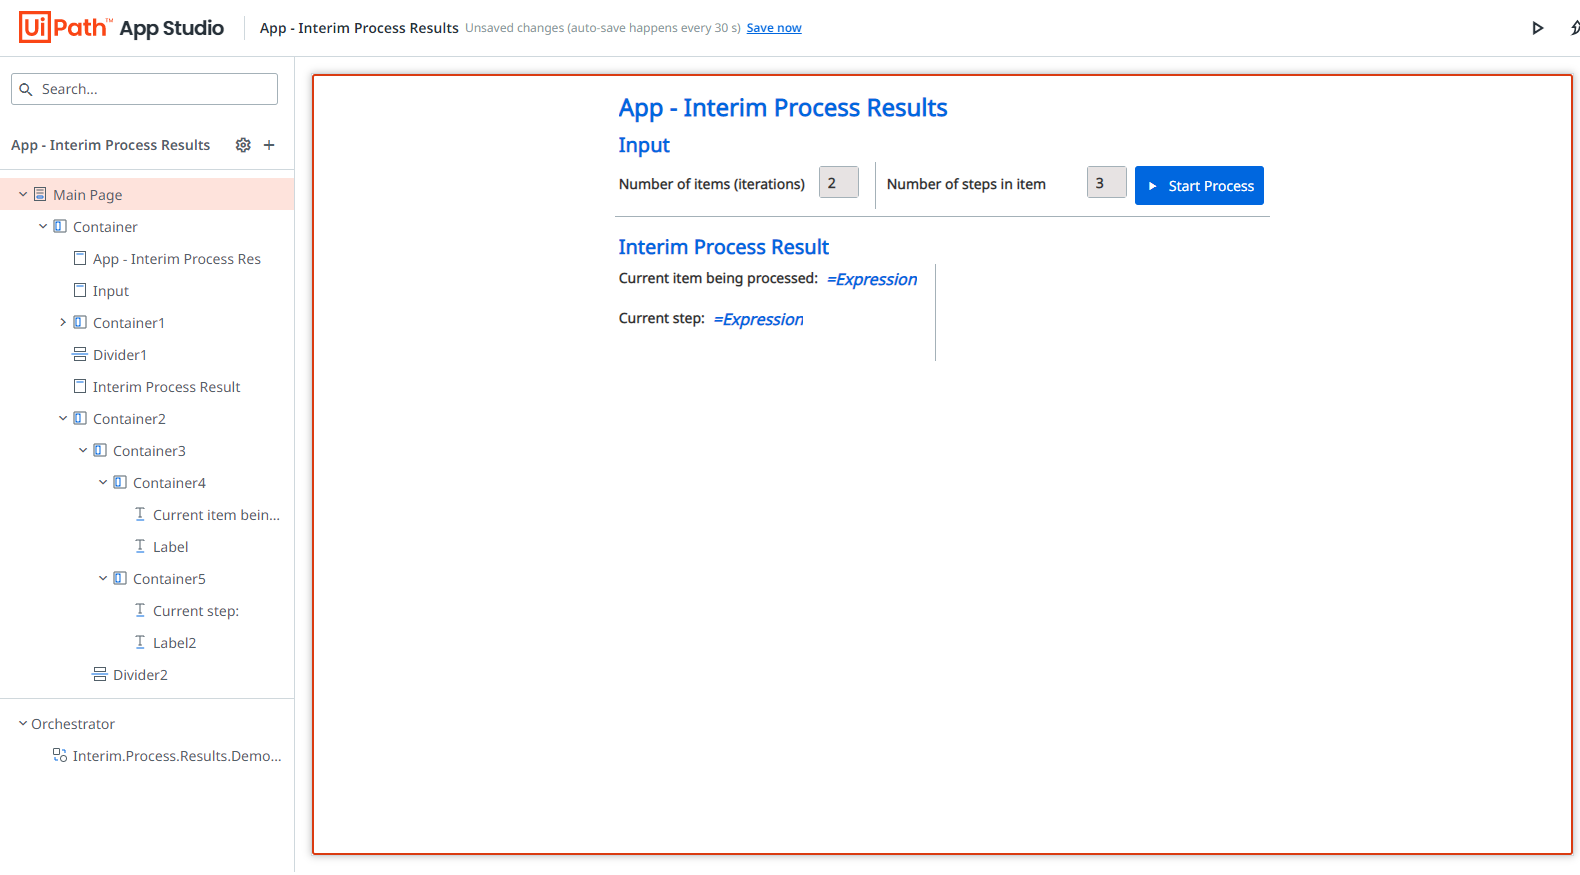
Add a container to the page.
-
Add a Header control in the container. Add App - Interim Process Results in the Text property. This will be the app title.
-
Add a second Header control below the previous one. Add Input in the Text property. Make sure that the font size is a bit smaller (for example,
20 px).- Add a Textbox control inside the container. Add the
in_number_of_itemsargument from the previously referenced process in the Value binding property. Add2in the Default text property andNumber of items (iterations)in the Label property. - Add a Divider to the right of the Textbox control.
- Add a Textbox control to the right of the Divider. Add the
in_number_of_stepsargument from the previously referenced process in the Value binding property. Add3in the Default text property andNumber of steps in itemin the Label property. - Add a Button control to the right of the Textbox. Add
Start Processin the Text property. Configure a Start process rule for the Clicked on event. Configure the rule to start the process referenced at the beginning and mark it as Attended.
- Add a Textbox control inside the container. Add the
-
Add a Divider below the container.
-
Add a Header below the divider. Add Interim Process Result in the Text property.
-
Add a Container below the header.
-
Add two more Container control one inside each other.
- Add a Label inside the last container. Add
Current item being processed:in the Text property. - Add a second Label next to the previous one. Add
out_current_itemargument from the referenced process in the Text property.
- Add a Label inside the last container. Add
-
Add a Container below the last one.
- Add a Label inside the last container. Add
Current step:in the Text property. - Add a second Label next to the previous one. Add
out_current_stepargument from the referenced process in the Text property.
- Add a Label inside the last container. Add
-
Add a Divider to the right of the last two containers.
-
Add a Container to the right of the Divider and another Container inside the first one.
- Add a Label control and add
Step completion % :in the Text property. - Add two more Container controls, one inside each other, and a Label control and a Slider control in the last one. Add the
out_progress_percentageargument of the process in the Text property of the Label. Configure the Slider properties: Slide increment to0and Default value to0.
- Add a Label control and add
-
Add a Divider below.
-
Add a Table control below the divider.
- Add the
out_progress_datatableargument of the process in the Data Source field. - Add an Item Number column and provide
Item Numberfrom the datatable process as Source. - Add an Step Number column and provide
Step Numberfrom the datatable process as Source. - Add a Time column and provide
Timefrom the datatable process as Source. - Add a Progress % column and provide
Progress %from the datatable process as Source.
- Add the
Result
In the end, your app should look similar to the one below:
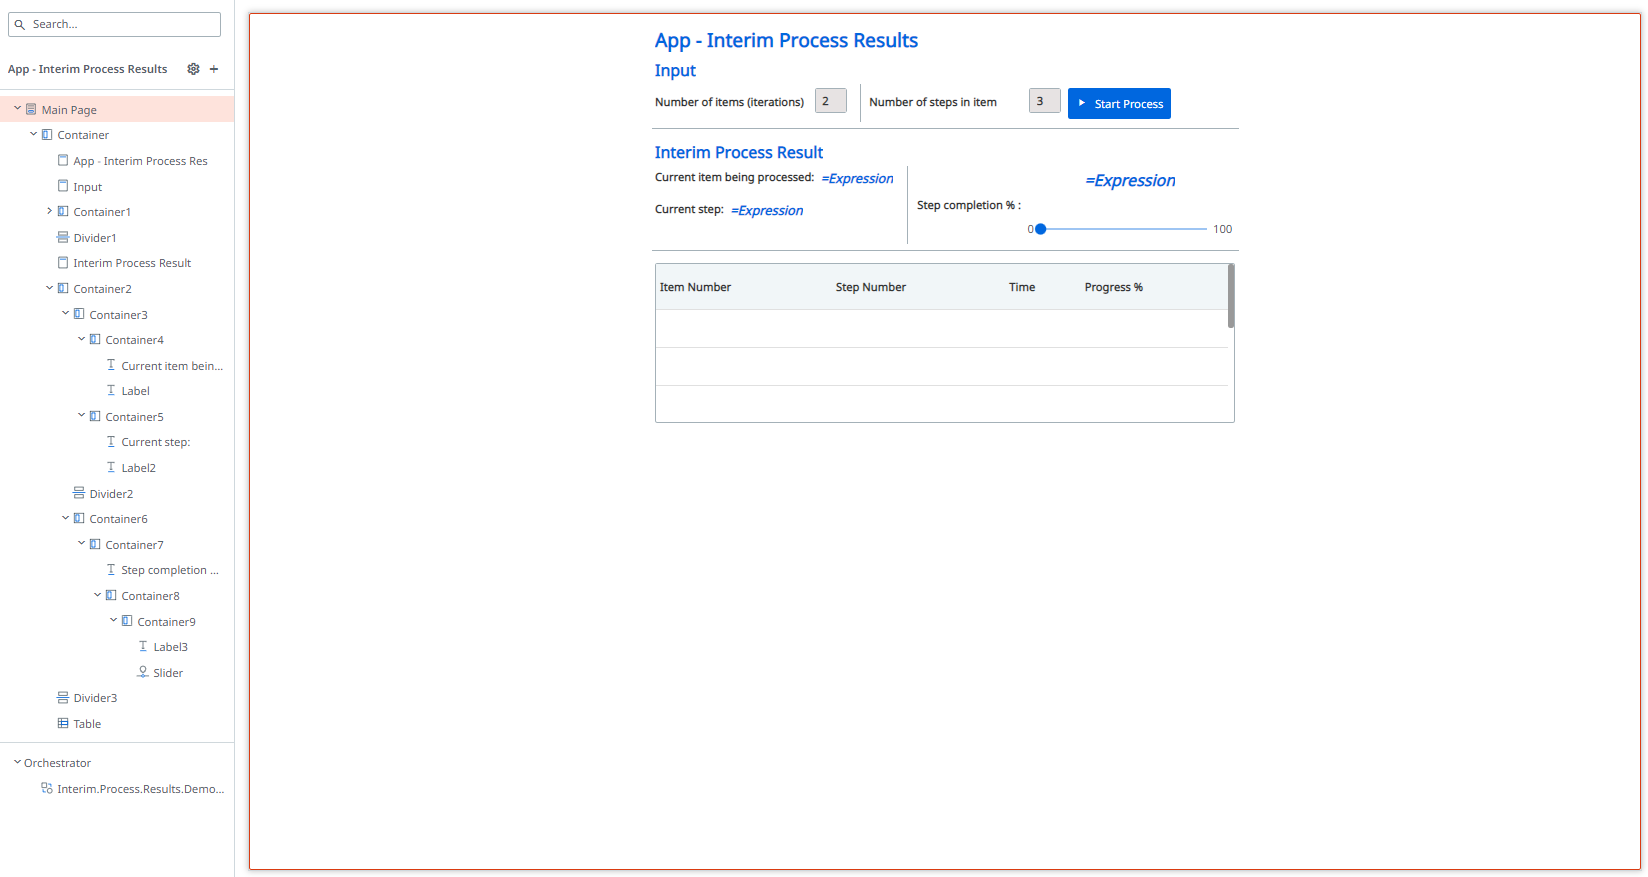
Result
When previewing the app, you can press the Start Process button.
The app will provide the following interim information for the process:
-
Current item being processed
-
Current step
-
Step completion (percentage)
-
Table with information regarding the item, step number, timestamp, and progress.
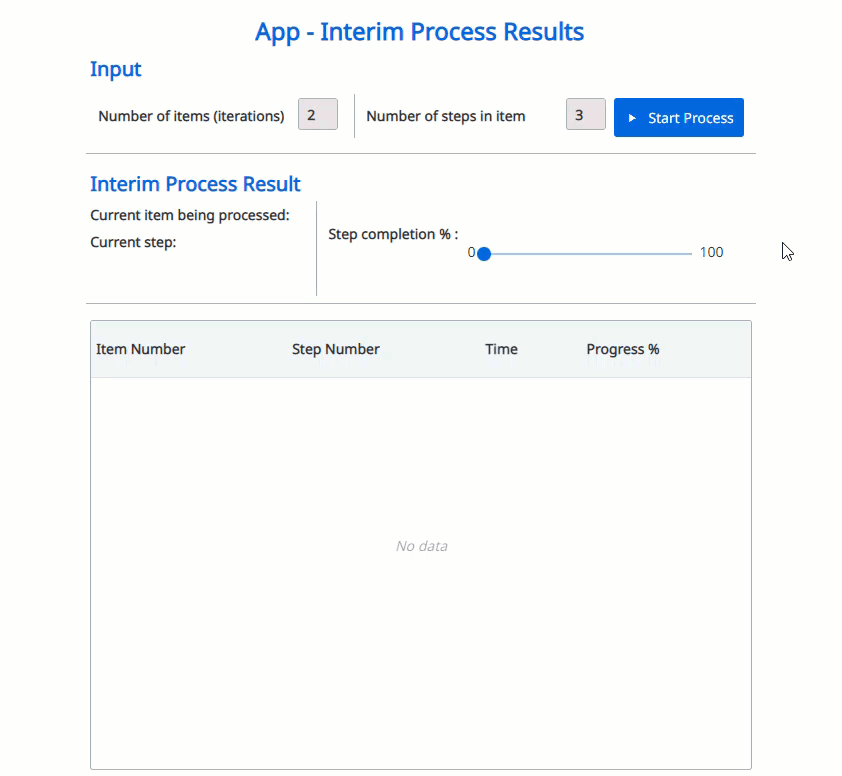
You can also change the number of items or the steps in an item using the textfields.
Sample Workflow
To check the complete workflow and app or to have a future reference, download the files from here.