Build and Filter DataTable
The example below explains how to filter and extract data from a DataTable by using Build Data Table, Filter Data Table, Output Data Table, For Each Row, and Get Row Item activities. You can find these activities in the UiPath.System.Activities package.
This is how the automation process can be built:
-
Open Studio and create a new Process.
-
Drag a Sequence container in the Workflow Designer.
-
Create the following variables:
Variable Name Variable Type Default Value DT1DataTable DT2DataTable DataTableStringString
-
-
Drag a Build Data Table activity inside the Sequence container.
- In the Properties panel, add the variable
DT1in the DataTable field. - Click the DataTable button. The Build Data Table window contains a table with two columns and rows.
- Click the Add Column button and add a new column.
- Click the Edit Column button from the first column and add the value
Namein the ColumnName field. - Select the String option from the Data Type drop-down list.
- Select the check box for the Allow Null option.
- Add the value
-1in the Max Length field. - Click the OK option for closing the window.
- Click the Edit Column button from the second column and add the value
Surnamein the ColumnName field. - Select the String option from the Data Type drop-down list.
- Select the check box for the Allow Null option.
- Add the value
-1in the Max Length field. - Click the OK option for closing the window.
- Click the Edit Column button from the third column and add the value
Gradein the ColumnName field. - Select the Int32 option from the Data Type drop-down list.
- Select the check box for the Allow Null option.
- Add the value
-1in the Max Length field. - Click the OK button for closing the window.
- Click the OK button again.
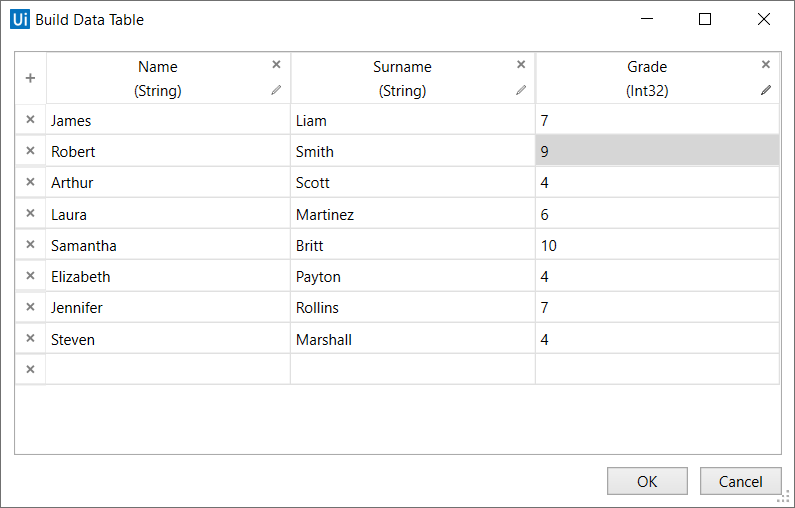
- This is how the DataTable window should look:
- In the Properties panel, add the variable
-
Drag a Filter Data Table activity below the Build Data Table activity.
-
Click the Filter Wizard button.
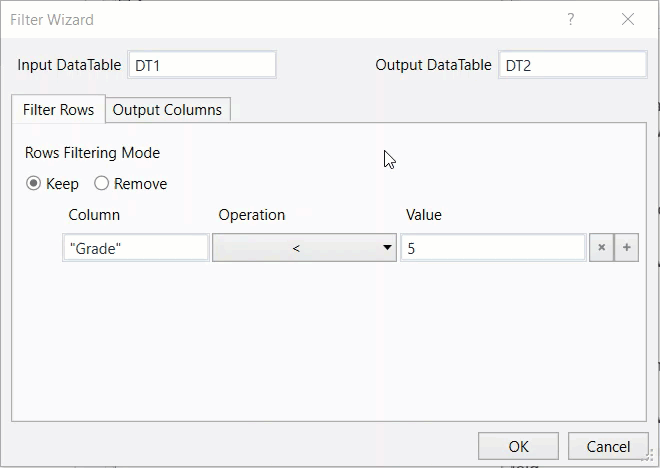
- Add the variable
DT1in the Input DataTable field. - Add the variable
DT2in the Output DataTable field. - Select the Keep option for the Rows Filtering Mode field.
- Add the value
"Grade"in the Column field. - Select the < value from the Operation drop-down list.
- Add the value
5in the Value field. - Click the Output Columns tab.
- Select the Keep option for the Columns Selection Mode field.
- Add the columns "Name" and "Surname".
- Click the OK button.
- This is how the Filter Wizard should look:
- Add the variable
-
Place an Output Data Table activity below the Filter Data Table activity.
- In the Properties panel, add the variable
DT2in the DataTable field. - Add the variable
DataTableStringin the Text field.
- In the Properties panel, add the variable
-
Drag a Write Line activity below the Output Data Table activity.
- Add the variable
DataTableStringin the Text field.
- Add the variable
-
Place a For Each Row activity below the Write Line activity.
- Add the variable
DT1in the DataTable field.
- Add the variable
-
Select the Body container and create the following variable:
Variable Name Variable Type Default Value GradeInt32 -
Add a Get Row Item activity and place it inside the Body container.
- In the Properties panel, add the value
"Grade"in the ColumnName field. - Add the value
rowin the Row field. - Add the variable
Gradein the Value field.
- In the Properties panel, add the value
-
Place an If activity below the Get Row Item activity.
- Add the expression
Grade < 5in the Condition field.
- Add the expression
-
Drag a Write Line activity inside the Then field.
- Add the expression
"Failed:" + row("Name").ToString + " " + row("Surname").ToStringin the Text field.
- Add the expression
-
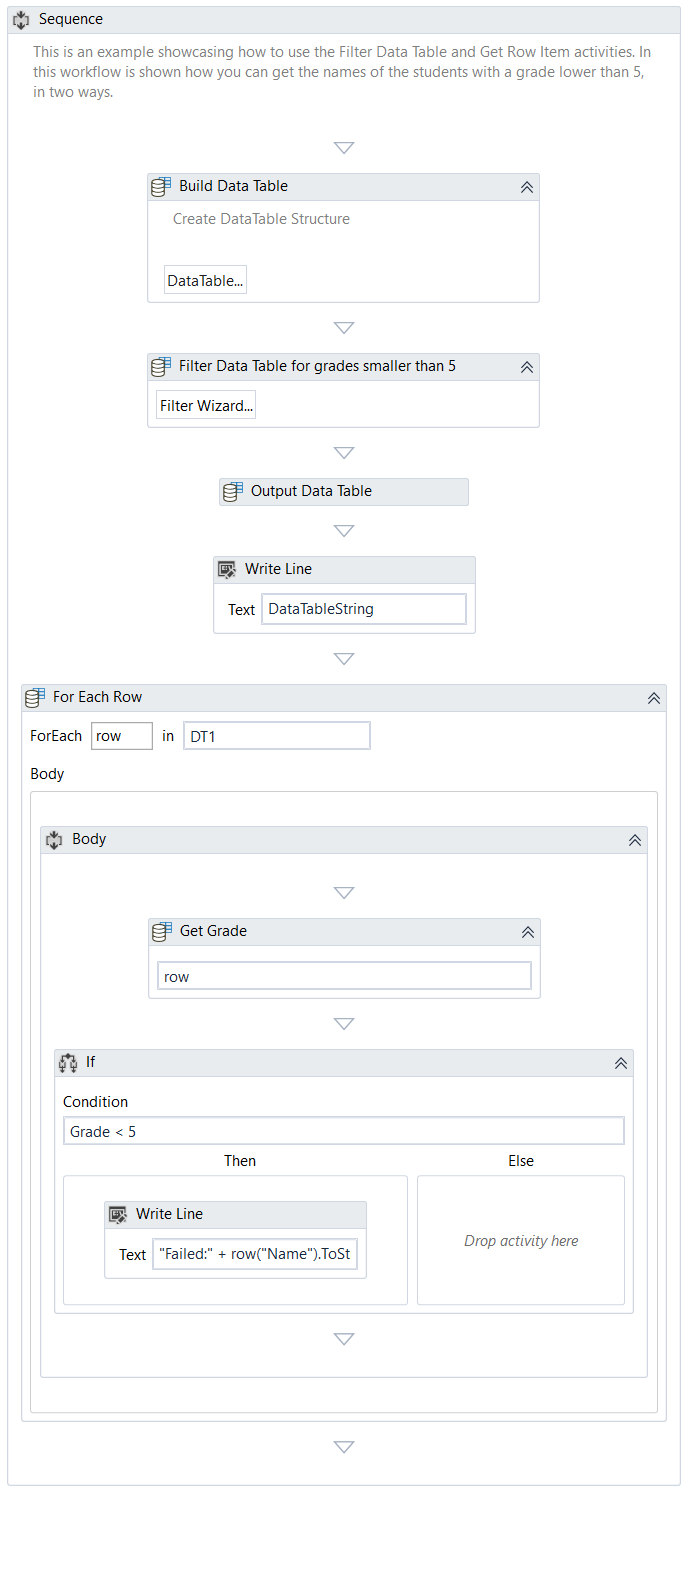
Run the process. The robot extracts all data meeting the requirements. This is how your workflow should look:
Here you can download an example.