Building a real-time calculator
Overview
To observe the instant communication between UiPath Apps and UiPath Robot, you would need to:
-
Build a project in UiPath Studio that consists of:
- Main.Xaml - the main workflow used to execute the triggers
- Several app-triggered workflows - used for basic arithmetic operations. These workflows are to be configured as entry points.
Arithmetic operation Studio workflow Addition Sum.xaml Subtraction Subtract.xaml Multiplication Multiply.xaml Division Divide.xaml - The trigger workflow - this workflow is available as a template, but you can also create it and customize it to your business needs
-
Build an app in UiPath Apps that consists of:
- Two input controls - where you input your numbers
- Four buttons controls - configured with the Trigger Workflow rule, to bind the button to a specific arithmetic operation, which is represented by a Studio workflow
- Four text boxes controls - where the result from the arithmetic operations are sent
Building the UiPath Studio project
Make sure you are using UiPath Studio versions 2023.4 and above, and UiPath Robot versions 2023.4 and above.
If possible, we recommend configuring the Studio project to Start as a background process. This is helpful to have the same app running simultaneously in multiple browser windows, without throwing errors.

Building the trigger workflow (template)
-
Open UiPath Studio and create a new process.
- Select the Language.
- Select Windows as the Compatibility.
-
Ensure you have following activity package versions:
- UiPath.WorkflowEvents.Activities 2.0
- UiPath.System.Activities 23.4+
-
Start from the template called Apps-Workflow communication/ In the Project panel, add a new workflow. This will contain the activities that enable the communication channel between UiPath Apps and UiPath Robot: Apps Request Trigger and Handle Apps Request activities.
If you use the Apps-Workflow communication template, skip to Building the calculator workflows.
-
Add the Apps Request Trigger activity. This must be the first activity in the workflow.
When you add the Apps Request Trigger activity to your workflow, the TriggerEventArgs argument is automatically created. Use it in the Handle Apps Request activity to access data from the response payload received after the workflow execution.
-
Add an If activity to catch the case of losing the connection with the Apps client. When the user closes the Apps client, all triggers should be stopped.
- In the Condition field, write the following expression:
ConditionTriggerEventArgs.ConnectionWithAppLost = true - In the Then section, add the Stop Local Triggers activity.
- In the Else section, add the Handle Apps Request activity.
- In the Arguments fields of the Handle Apps Request activity, use the TriggerEventArgs argument that was automatically created by the Apps Request Trigger activity. This argument contains the workflow payload received from the Apps Request Trigger activity, and passes it on to the Handle Apps Request activity. While executing the workflow, the Handle Apps Request activity uses the information in the payload to invoke the workflow, then sends back the workflow output results when the workflow completes.
note
The Handle Apps Request activity must be used inside the Else section of the condition for connection lost. This guarantees that the activity is invoked during an active connection between UiPath Apps and UiPath Robot. Therefore, when the connection is lost, the process execution terminates.
- In the Condition field, write the following expression:
Building the calculator workflows
-
Create a folder in your project and name it "Calculator". This is where you store the calculator workflows.
-
Inside the folder, create a workflow for each arithmetic operation:
Arithmetic operation Studio workflow Addition Sum.xaml Subtraction Subtract.xaml Multiplication Multiply.xaml Division Divide.xaml -
In all previously created workflows, define the following arguments:
Argument Name Direction Argument type number1 In Int32 number2 In Int32 result Out Int32 Double - for the division Arguments "number1" and "number2" are the data your Apps user inputs.
Argument "result" is the output received after the execution of the workflow.
-
In all previously created workflows, add the Assign activity. Configure it as follows:
Workflow Save to field Value to save field Sum.xaml result number1 + number2 Subtract.xaml result number1 - number2 Multiply.xaml result number1 * number2 Divide.xaml Result Cint(Math.Truncate(Decimal.Divide(number1,number2))) -
Save your workflows.
-
Mark the calculator workflows as entry points: right-click on each workflow, then select the Enable Entry Point option. Doing this ensures your XAMLs are displayed in your app.
Building the Main workflow
If you use the Apps-Workflow communication template, skip this step.
In the Main.xaml file, simply add the Run Local Triggers activity, and then save the file.
Managing the project in Orchestrator
- In Studio, publish your project package to an Orchestrator folder.
note
If you publish the project to a personal workspace, the corresponding process is automatically created. Skip to Building the Apps project.
- In your Orchestrator tenant, go to the folder where you have published the Studio package.
- Navigate to Automation > Processes, and click Add process.
- From the Package Source Name dropdown, select the Studio project.
- From the Entry point dropdown, select Main.xaml.
- On the next pages, configure your process as desired, and then click Create. Your Studio project is now available as an Orchestrator process.
Building the Apps project
Make sure you are using UiPath Apps with the VB Expressions option enabled.
Adding the controls
-
On the UiPath Apps home page > Build tab, click Create new app.
-
Enter the Name for your app. For example, "Real-time calculator".
-
For Expression Language, select VB.
-
On the MainPage, add the following controls with the following General properties:
Control General property : value Description 1. Label Text: "Real-time calculator" Adds a title to your app. 2. Textbox (Number) - rename it to "number1" Label: "First number" Hint text: "Input the first integer number" Allows users to input their data. 3. Textbox (Number) - rename it to "number2" Label: "Second number" Hint text: "Input the second integer number" Allows users to input their data. 4. Button - rename it to "sum" Text: "Sum" Triggers the execution of the Sum.xaml file. 5. Texbox - rename it to "sum_result" NA Outputs the response of the Sum.xaml file. 6. Button - rename it to "subtract" Text: "Subtract" Triggers the execution of the Subtract.xaml file. 7. Texbox - rename it to "subtract_result" NA Outputs the response of the Subtract.xaml file. 8. Button - rename it to "multiply" Text: "Multiply" Triggers the execution of the Multiply.xaml file. 9. Texbox - rename it to "multiply_result" NA Outputs the response of the Multiply.xaml file. 10. Button - rename it to "Divide" Text: "Divide" Triggers the execution of the Divide.xaml file. 11. Texbox - rename it to "divide_result" NA Outputs the response of the Divide.xaml file.
Adding the process
Add the process as a resource to bind the Studio workflows to the Apps controls.
- In your app, expand the Add control dropdown and select Process.
- A list of tenants for the current account is displayed. Choose the one that hosts the processes you need, then click Next.
- From the left-hand side panel, expand the Orchestrator folder where you created your process, select the process, then click Add. For example, select the "Calculator" process.
Once you add the process in your app, it displays the main workflow and the workflows marked as entry points, together with their input and output arguments, as defined in the Studio project.
Adding rules to Button controls
By adding the TriggerWorkflow rule to every Button control, you instruct the application to execute a specific workflow whenever the Apps user clicks the button.
Repeat the following steps for every button control:
-
Select the button control.
-
On the right-hand side, in the Events panel, click Create rule. The Configure rule wizard opens.
-
Search for the TriggerWorkflow rule and select it.
-
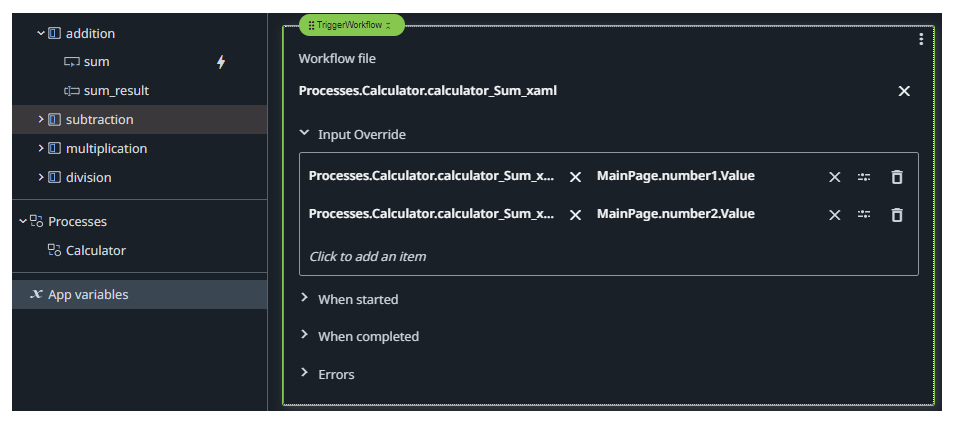
In the Workflow file field, expand the previously added process ("Calculator") and select the corresponding workflow (.xaml file). For example, the Sum button must reference the "calculator_Sum_xaml" file.
-
Click on the Input Override field, then expand the previously selected workflow.
-
Double-click "number1" to select it as the first input argument.
-
For the Enter value field, click the "tune" icon to Open the expression editor, and write the following VB expression:
MainPage.number1.Value -
Double-click "number2" to select as the second input argument.
-
For the Enter value field, click the "tune" icon to Open the expression editor, and write the following VB expression:
MainPage.number2.Valuenote"number1" and "number2" in the expression reference the Textbox(number) controls, which were renamed to "number1" and "number2" respectively. By setting the value of these controls as the values for the input arguments, you pass the user inputs from Apps to the Studio workflow.
-
-
Expand the When completed field and add the Set Value rule.
-
For the Item To Set field, click the "tune" icon to Open the expression editor, and reference the result control. For example, for the sum result, write the following VB expression:
MainPage.sum_result.Value -
For the Value field, click the "tune" icon to Open the expression editor, and reference the workflow result. For example, for the sum operation, write the following VB expression:
Processes.Calculator.calculator_Sum_xaml.result.ToString.noteAdding the Set Value rule in the When completed field ensures the value used to bind the workflow result to the corresponding result control is correct, as it uses the values returned as output after the workflow execution completes.

-
-
Repeat the previous steps for the remaining buttons:
Button control Workflow file Subtract calculator_Subtract_xaml Multiply calculator_Multiply_xaml Divide calculator_Divide_xaml
Publishing and deploying your app in Orchestrator
To prepare your app for execution, you need to publish it to the Orchestrator tenant feed, and then deploy it.
- In Apps, click Publish on the top navigation bar.
- Switch to Orchestrator and navigate to the desired folder.
- Go to Automations > Apps and click Deploy app. The Deploy app wizard opens.
- From the App dropdown, select the previously published app.
- Click Deploy. Now your app is available in your Orchestrator folder to run.
Running your app
You are ready to run your app.
- In UiPath Assistant, on the Home panel, search for your app under the Apps category.
- Click Run. You are prompted to grant UiPath Robot Assistant access.
- Input two numbers.
- Click a button for the desired arithmetic operation.
The first computation takes longer because it is the first instantiation of the job. After that, the job keeps running and instantly returns the results. When you close the Apps session, the job terminates.