Dynamic Checkboxes
This is a step-by-step tutorial demonstrating how to configure and use dynamic checkboxes. Dynamic checkboxes allow you to view an entire list of data entries and select one or more, according to your use case. Dynamic checkboxes are created using the Select Boxes component in the Form Designer.
This tutorial demonstrates how to configure dynamic checkboxes for C# project types only.
Tutorial
To use this feature:
- Add an Invoke Code activity into your workflow. This is where you create a List of strings, that holds the choices that appear dynamically in the form.
-
Click Edit Arguments and create an argument named, for this example,
choiceList. Set the Direction asIn/Outand the Type asList<String>. In the Value field, pressCTRL + kon your keyboard and create aList<String>variable, calledGchoiceList. This variable holds the choices that you want to display dynamically.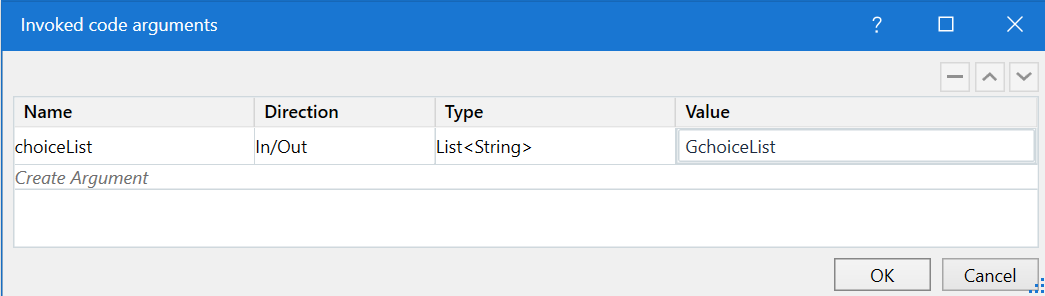
-
Click Edit code and input the initializing code snippet. Make sure to use the correct syntax depending on your chosen programming language (C# or VB.NET). For example, to define four choices for the
choiceListargument, use the following code:choiceList = new List<string>();
choiceList.Add("Choice1");
choiceList.Add("Choice2");
choiceList.Add("Choice3");
choiceList.Add("Choice4");
-
- Add a Create Form activity into your workflow.
-
Open the FormFieldsCollection property window.
-
Create a
Dictionary<String,Boolean>type of argument. Name itchoices, set the Direction asIn/Out, and the Value as thechoicesvariable. This argument maps the choices selected in the form back into the workflow. -
Create a
List<String>type of argument. Name itchoices_selectboxes, set the Direction asIn/Out, and the Value as theGchoiceListvariable. This argument makes the list that holds the choices (Gchoicelist) to be dynamic, by adding the_selectboxessuffix to it. -
Check GenerateInputFields. This enables the form to automatically generate a Select Boxes component inside the form, based on the arguments mapped in the FormFieldsCollection property window.
 note
noteThe form determines automatically that it is dealing with a set of dynamic checkboxes and displays them accordingly.
These checkboxes can then be later edited from the Form Designer (for example, setting the minimum or maximum choices a user can make).
-
- Add a For Each activity into your workflow. This activity iterates through every choice in the dynamic list and retrieves the name and value for each choice.
- In the TypeArgument property, choose
System.Collections.Generic.KeyValuePair<System.String,System.Boolean>. - Inside the body of the activity, type in
keyValin the ForEach field. - Inside the body of the activity, pass the
choicesvariable in the In field.
- In the TypeArgument property, choose
- Add a Log Message activity into the Body of the For Each activity. This activity is used to output the choices selected by a user inside the form.
-
Set the Log Level as
Info. -
In the Message property field, pass the following expression:
keyVal.Key +":" + keyVal.Value.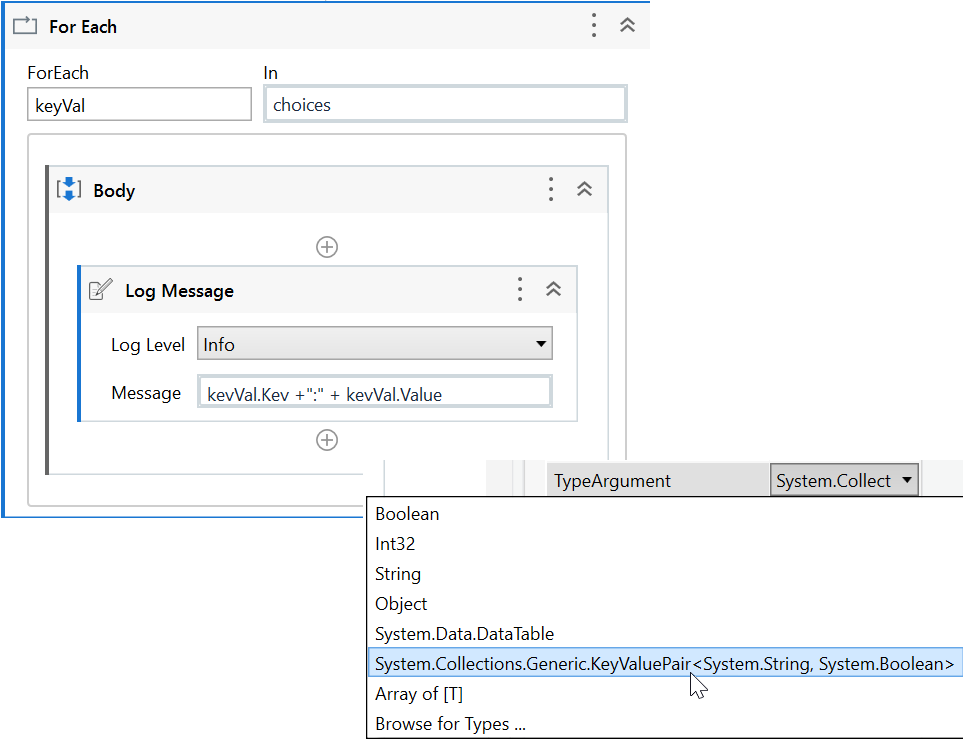
-
Result
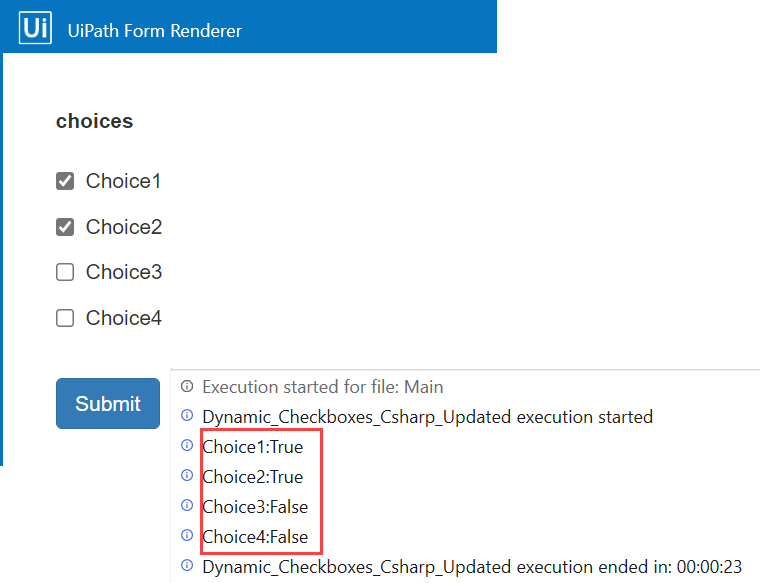
The Select Boxes component is dynamically populated with the values held in the GchoiceList. For this example, a business user selects the first and second choice inside the form. When the form is submitted returns into the workflow, it displays the choices selected by the user as True and the ones that haven't been selected as False, in the Output panel.
Sample Workflow
To check the complete workflow or to have a future reference, download the XAML example