User Triggered Activities
The examples below explain how to execute activities triggered by the user's actions (mouse click or keystroke) using activities such as Monitor Events. You can find these activities in the UiPath.System.Activities package.
There are three workflows, each explaining a different action that can trigger an activity.
Activity triggered by clicking an image
This is how the automation process can be built:
-
Open Studio and create a new Process.
-
Drag a Sequence container in the Workflow Designer.
-
Create the following variable:
Variable Name Variable Type Default Value TargetElementUiElement
-
-
Add a Monitor Events activity inside the Sequence container.
- In the Properties panel, add the value
Falsein the RepeatForever field.
- In the Properties panel, add the value
-
Add a Click Image Trigger activity inside the Monitor Events activity.
- Inside the activity, click Indicate image on screen, and then select the UiPath Studio taskbar button like in the following GIF:

-
Drag a Sequence container below the Click Image Trigger activity inside the Monitor Events activity. Name the sequence Event Handler.
-
Add a Get Source Element activity inside the Event Handler sequence.
- In the Properties panel, add the variable
TargetElementin the UiElement field.
- In the Properties panel, add the variable
-
Add a Highlight activity below the Get Source Element activity inside the Event Handler sequence.
- In the Properties panel, add the variable
TargetElementin the Element field. - Add the value
1500in the HighlightTime field.

- In the Properties panel, add the variable
-
Run the process. The process waits for you to click the UiPath Studio button in the taskbar and then highlights it.
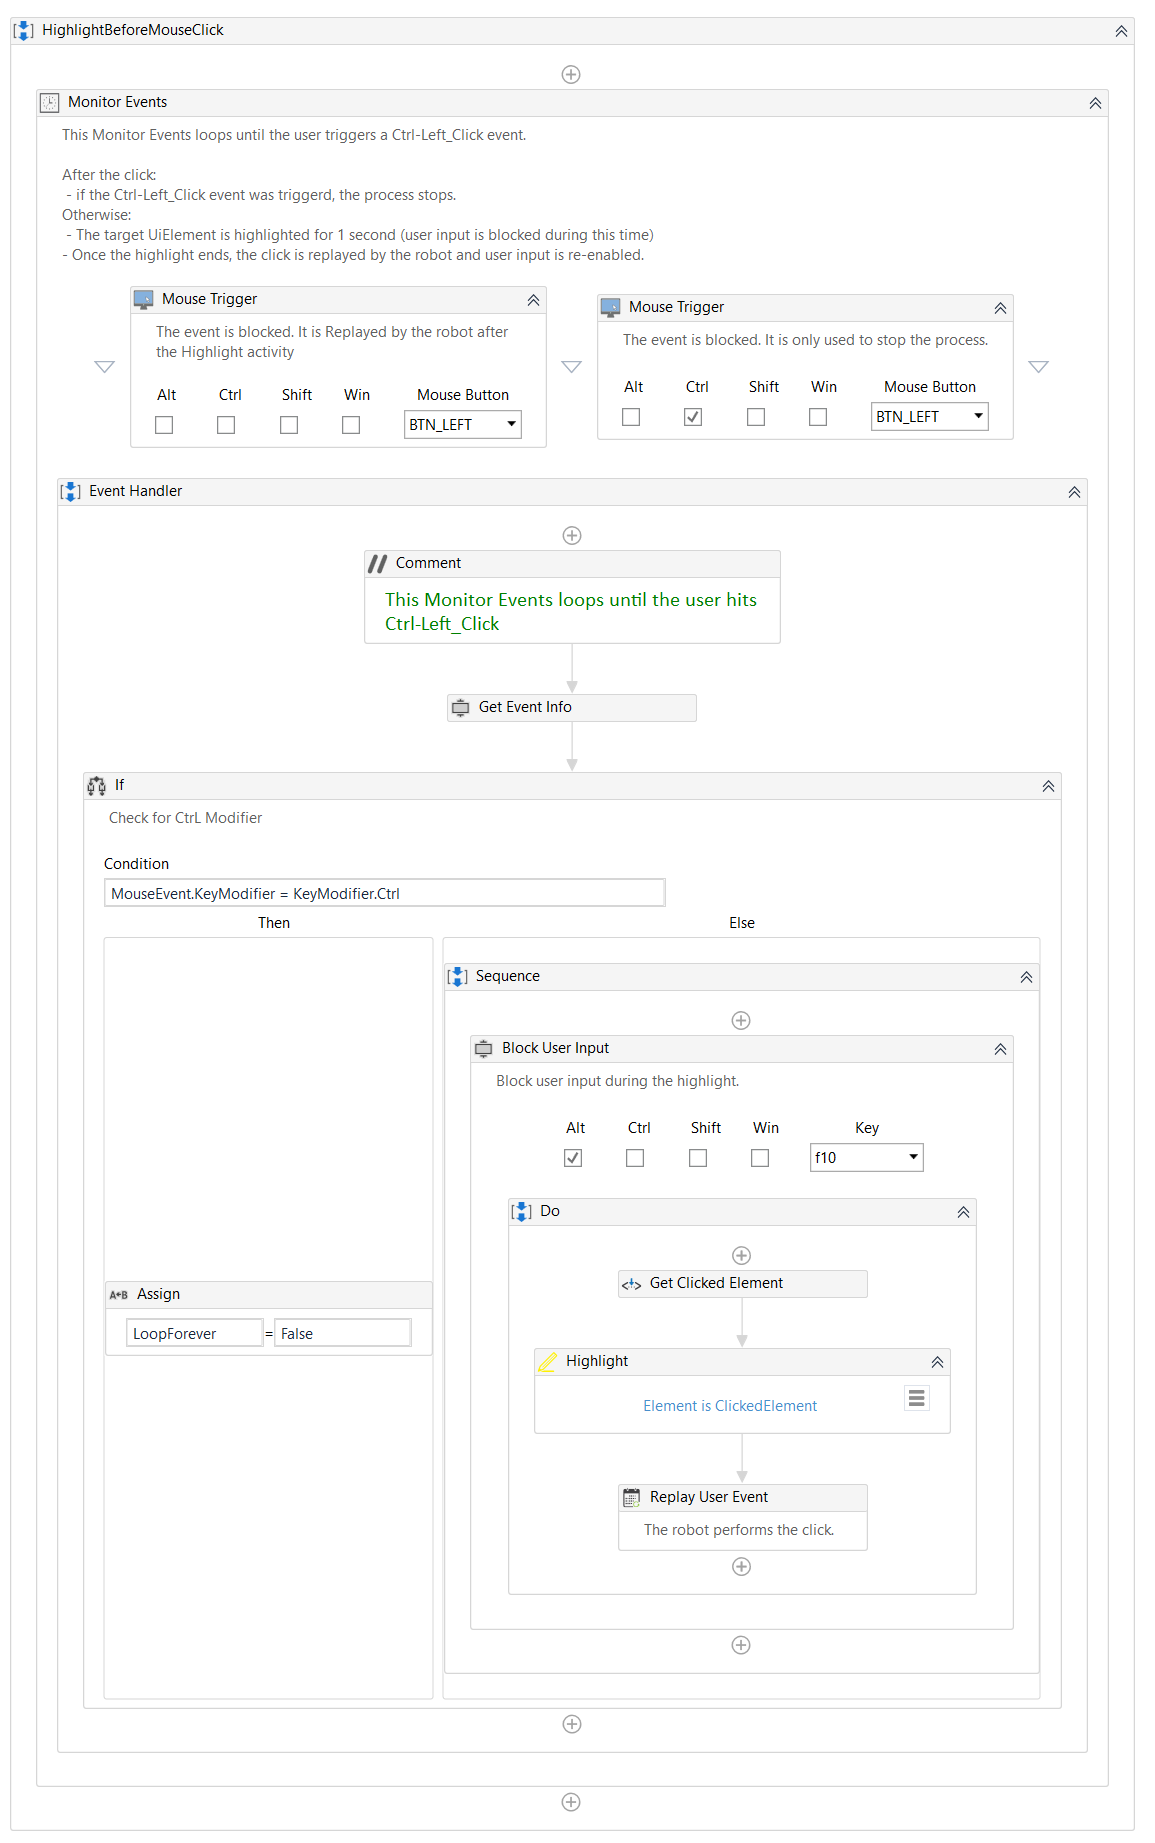
Activity triggered by a mouse click
This is how the automation process can be built:
-
Open Studio and create a new Process.
-
Drag a Sequence container in the Workflow Designer.
-
Create the following variable:
Variable Name Variable Type Default Value LoopForeverBoolean True
-
-
Add a Monitor Events activity inside the Sequence container.
- In the Properties panel, add the variable
LoopForeverin the RepeatForever field.noteAdd Mouse Trigger activities for controlling the Monitor Events loops. The first Mouse Trigger blocks the event until the element is highlighted. The second Mouse Trigger stops the process.
- In the Properties panel, add the variable
-
Add a Mouse Trigger activity inside the Monitor Events activity.
- In the Properties panel, select the EVENT_BLOCK option from the EventMode drop-down list.
-
Add another Mouse Trigger activity next to the previous one, inside the Monitor Events activity.
- In the Properties panel, select the EVENT_BLOCK option from the EventMode drop-down list.
- Select the Ctrl option from the KeyModifiers drop-down list.
-
Add a Sequence activity below the Mouse Trigger activities inside the existing sequence.
-
Create the following variable:
Variable Name Variable Type Default Value MouseEventEventInfo
-
-
Add a Get Event Info activity inside the previously created Sequence container.
- Add the variable
MouseEventinside the Result field.
- Add the variable
-
Add an If activity below the Get Event Info activity.
- Add the expression
MouseEvent.KeyModifier = KeyModifier.Ctrlin the Condition field.
- Add the expression
-
Add an Assign activity inside the Then field of the If activity.
- Add the variable
LoopForeverin the To field. - Add the value
Falsein the Value field.
- Add the variable
-
Add a Block User Input activity inside the Else field of the If activity.
-
Select the Do container inside the activity and create the following variable:
Variable Name Variable Type Default Value ClickedElementUiElement
-
-
Add a Get Source Element activity inside the Do container of the Block User Input activity.
- Add the variable
ClickedElementinside the UiElement field.
- Add the variable
-
Add a Highlight activity below the Get Source Element activity.
- In the Properties panel, add the variable
ClickedElementin the Element field.
- In the Properties panel, add the variable
-
Add a Replay User Event activity below the Highlight activity.
-
Run the process. The process highlights every element clicked using the left mouse button. The process stops when the Ctrl
- left mouse click trigger is detected.
Activity triggered by mouse click or keystroke
This is how the automation process can be built:
-
Open Studio and create a new Process.
-
Drag a Sequence container in the Workflow Designer.
-
Add a Monitor Events activity inside the Sequence container.
- In the Properties panel, add the value
Falsein the RepeatForever field.
- In the Properties panel, add the value
-
Add a System Trigger activity inside the Sequencecontainer.
-
Drag a Sequence container below the System Trigger activity inside the Monitor Events activity. Name the sequence Event Handler.
-
Create the following variable:
Variable Name Variable Type Default Value SystemEventEventInfo
-
-
Add a Get Event Info activity inside the Event Handler sequence.
- In the Properties panel, add the variable
SystemEventin the Result field.
- In the Properties panel, add the variable
-
Add an If activity below the Get Event Info activity.
- Add the expression
SystemEvent.MouseEventInfo isnot Nothingin the Condition field.
- Add the expression
-
Add a Message Box activity inside the Then field of the If activity.
- Add the following expression in the Text field:
"Mouse Button Pressed: " + SystemEvent.MouseEventInfo.Button.ToString + vbCrLf + vbCrLf + "Modifiers used: " + SystemEvent.KeyModifier.ToString.
- Add the following expression in the Text field:
-
Add a Message Box activity inside the Else field of the If activity.
- Add the following expression in the Text field:
"Key Pressed: " + SystemEvent.KeyEventInfo.KeyName + vbCrLf + vbCrLf + "Modifiers used: " + SystemEvent.KeyModifier.ToString.

- Add the following expression in the Text field:
-
Run the process. When a trigger is used, a message box is displayed with information about the detected mouse click or keystroke.
Here you can download an example.