Running DataUploader
Follow these steps to load data using DataUploader.
- Download the DataUploader.
- Create a folder and copy the input files the that you want to upload using DataUploader in this folder.
- Open a Windows Powershell.
- Navigate to the location where you downloaded the DataUploader.
- Run one of the following commands:
important
Enclose each parameter value in quotes.
process-mining-data-uploader.exe "<csv dir>" "<sas url>" "<end-of-upload api>"
process-mining-data-uploader.exe -c "<myfolder>" -s "<my-sas-uri>" -e "<my-end-of-upload-api>"
process-mining-data-uploader.exe --config-file "path\to\config\file"
A progress bar is displayed for each file upload.
Example command string
./process-mining-data-uploader.exe "data" "https://asdf.blob.core.windows.net/a28d10b0-6822-4xxy-a197-02zz39824ad4?sv=2020-06-12&si=sap-a58d10b0-6822-4ffc-a197-02ed649824ad4&sr=c&sig=WELk3bW8zpY5rL71lJ8pPPhlOq0odLNoQleY%2BL3nPqek%3D" "https://asdf.uipath.com/org/tenant/processmining_/api/v4.0/apps/a28d10b0-6822-4ffc-a197-02ed39824ad4/ingest/authenticated?AppSecretToken=A5B221CD00E77F02677G36H572IJKLM61N2440320O44666PQ4RS3T0U81410VW" "44"
Incremental extraction
Follow these steps to run the DataUploader with incremental sync.
- Open a Windows Powershell and navigate to the location where you downloaded the DataUploader.
- Make sure all input files follow the required naming format. See File naming for incremental sync.
- Run the DataUploader with the
--tablesparameter. The following code shows an example command.process-mining-data-uploader.exe -c "<csv dir>" -s "<sas url>" -e "<end-of-upload api>" --tables '[{"prefix": "pfx01", "name": "Table01", "load-type": "incremental"}, {"prefix": "pfx02", "name": "Table02", "load-type": "full"}]'importantEnclose each parameter value in quotes.
After each run, DataUploader saves the sync status to a file in the same folder as the executable.
Files whose prefix does not match any entry in the --tables parameter are ignored. When --tables is not provided, all files in the folder are uploaded.
File naming for incremental sync
All files intended for incremental ingestion must follow this naming format:
<table-prefix>_<any text>_<yyyymmdd>T<HHMMSS>.<extension>
Example:
pfx01_filename-part-not-read-by-data-uploader_20240221T142100.csv
| Part | Description |
|---|---|
<table-prefix> | Must match a prefix defined in the --tables parameter. Must not contain underscores. |
<any text> | Any descriptive text. Not used by DataUploader. |
<yyyymmdd>T<HHMMSS> | Timestamp of the data extraction from the source. T separates date and time. |
<extension> | Any file extension. |
Troubleshooting
Maximum file size
The maximum file size (per file) is 5TB.
Number of retries
If the upload fails, for example, due to an unstable connection, DataUploader will retry the upload up to 4 times. If the data upload was not successful after 5 times, a report is created.
Under certain network configurations DataUploader fails to reach the end-of-upload API due to a self signed certificate, and you will get the error such as UNABLE_TO_GET_ISSUER_CERT_LOCALLY. This can be resolved by pointing DataUploader to your organization's Certificate Authority (CA) certificate. Follow these steps.
- Create an environment variable called NODE_EXTRA_CA_CERTS.
- Set the value of the new environment variable to the file path of your CA certificate.
In case some of the files have failed the upload, you can restart DataUploader using the same command and with same files.
Calling End of upload API
What if my files are uploaded, but end of upload endpoint is not called?
Occasionally, it can happen that End of upload API is not called successfully, even after all files are uploaded. If you do not see following log after files are uploaded from data uploader, it means that End of upload API was not called successfully:
End-of-upload API reached successfully, data transformation started.
In this case, you can copy and run the following code in a PowerShell session to call the End of upload API.
$endOfUploadUri = "*******"
$delimiter = 9 # you can change this to the ascii of the character of your choice
$fullUri = "$endOfUploadUri&dataLoadOptionsJson=%7B%22UseSampleData%22%3Afalse%2C%22FileFormatOptions%22%3A%7B%22FieldDelimiter%22%3A%22$delimiter%22%7D%7D"
$response = Invoke-WebRequest -Uri $fullUri -Method POST
Write-Output $response.StatusCode
Certificates
Under certain network configurations, DataUploader fails to reach the end-of-upload API due to a self-signed certificate, and you will get an error such as UNABLE_TO_GET_ISSUER_CERT_LOCALLY. You can fix this by providing DataUploader with the valid certificate chain.
Follow these steps to provide DataUploader with the valid certificate chain.
-
Go to the Process Mining Portal and from the Process apps tab, open the process app.
-
Navigate to the address bar in the web browser and select the View site information icon at the left in the address bar.
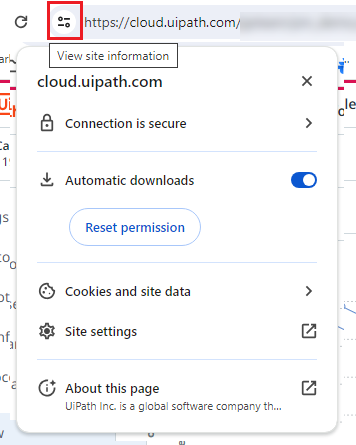
-
Select Connection is secure, and then select Certificate is valid to display the certificate.
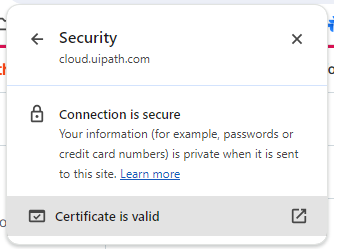
-
Go to the Details tab, and expand the Certificate Hierarchy.
-
Select the
cloud.uipath.comentry and select Export....
-
Select a location to save the certificate file on your computer and make sure to save it as type Base64-encoded ASCII, certificate chain (*.pem;*crt).
The
cloud.uipath.crtfile will appear in the selected location. -
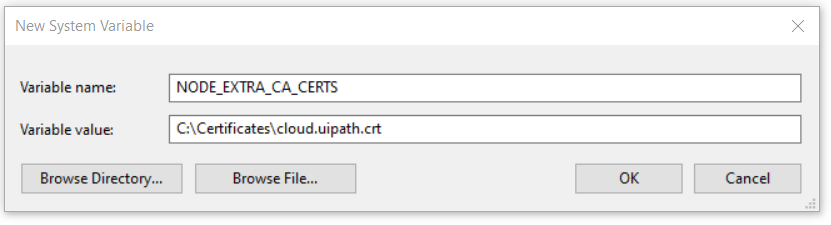
Create an environment variable NODE_EXTRA_CA_CERTS and set the value of this variable to the full file path of the certificate selected in step 6 (including the folder path, file name and file extension)
- Open the Windows System Properties.
- Go to the Advanced tab.
- Select Environment Variables.
- Select New to add a new System variable.
- Initiate a new PowerShell session to ensure that the environment variable is recognized by the DataUploader.