Data models
Data model requirements
Currently, multi-process Process Mining is only available for newly created apps. Apps created before multi-process Process Mining was released will not see Object and Event tables.
The data model can contain multiple Object tables. This allows you to model a more complex data structure and relationships, creating a data model that closely mirrors your business process scenarios. For each Object table, you can add multiple Events tables, which contain the events performed on that object.
| Table type | Description | Example |
| Object | Stores descriptive data about business entities (objects). An object table can also serve as a master data table containing reference information. | Invoices, Incident tickets, Products. |
| Events | Stores data about the steps or actions performed on objects, including timestamps. | "Create invoice", "Assign ticket", "Assemble product" |
If you define multiple Event tables in your data model, the events will be available in Data Manager in a single Events table.
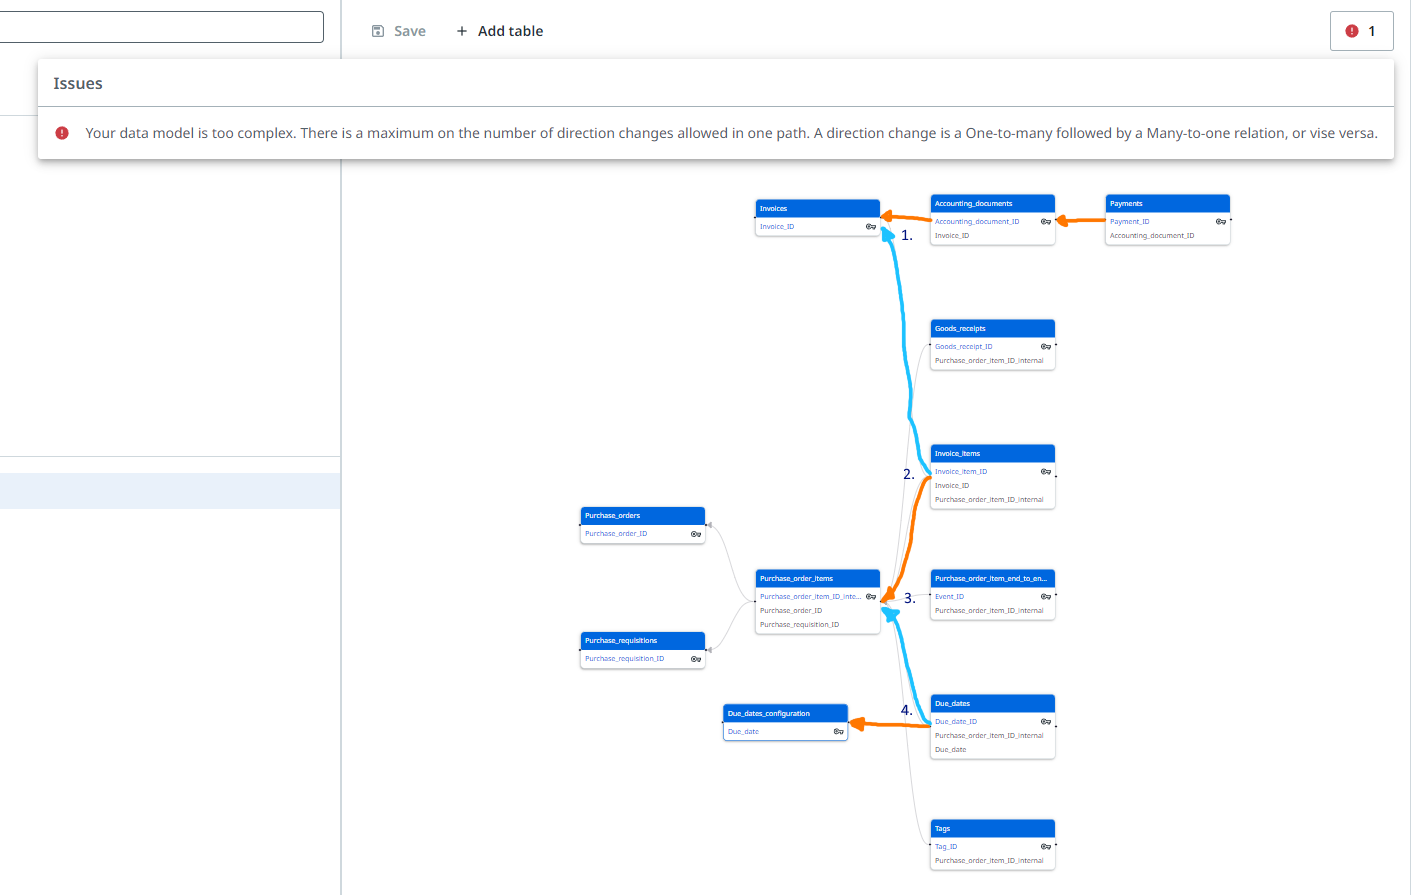
A data model can only be saved when it adheres to the following requirements:
-
The data model includes no more than 40 tables.
-
The data model contains at least one object table and a related events table.
-
Each Events, Tags, and Due date table is connected to only one related object table.
-
All tables are connected to the overall data model.
-
There are no circular relations in the data model.
-
A maximum of 10 direction changes are allowed in one relation path.
tipA direction change is a one-to-many relation followed by a many-to-one relation, or vice versa.
Types of tables
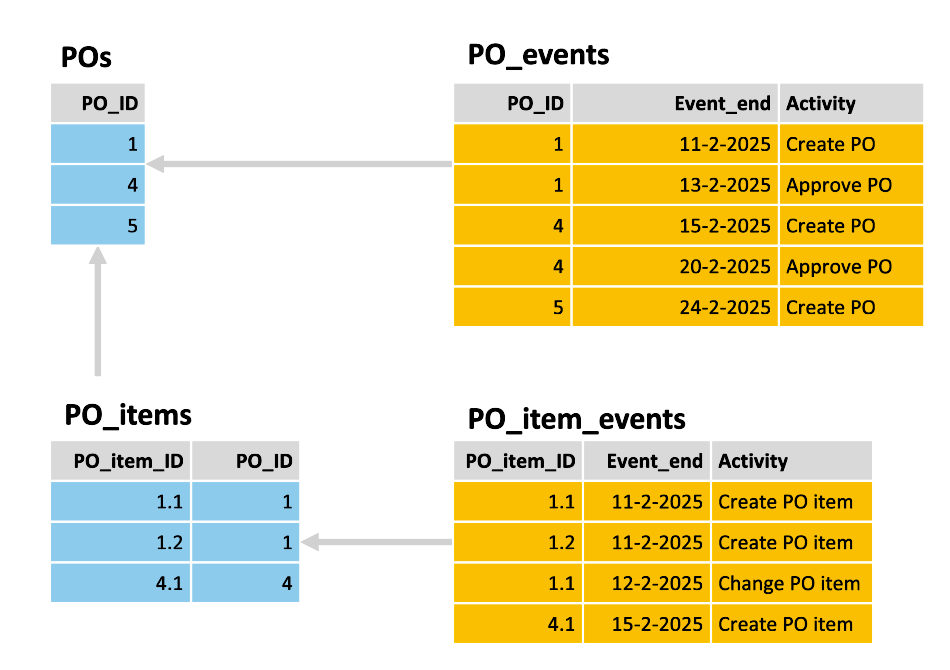
The following illustration shows an example data model with a POs Object table and a related PO_events Events table, and a PO_items Object table and a related PO_item_events Events table.
Object tables
Each object in your data model has its own Object table in Data Transformations. An Object table contains the fields that have been defined specifically for that object.
Process tables
Each process defined in your data model has its own Process table with the projected events for that process. The following fields are always present in the event tables:
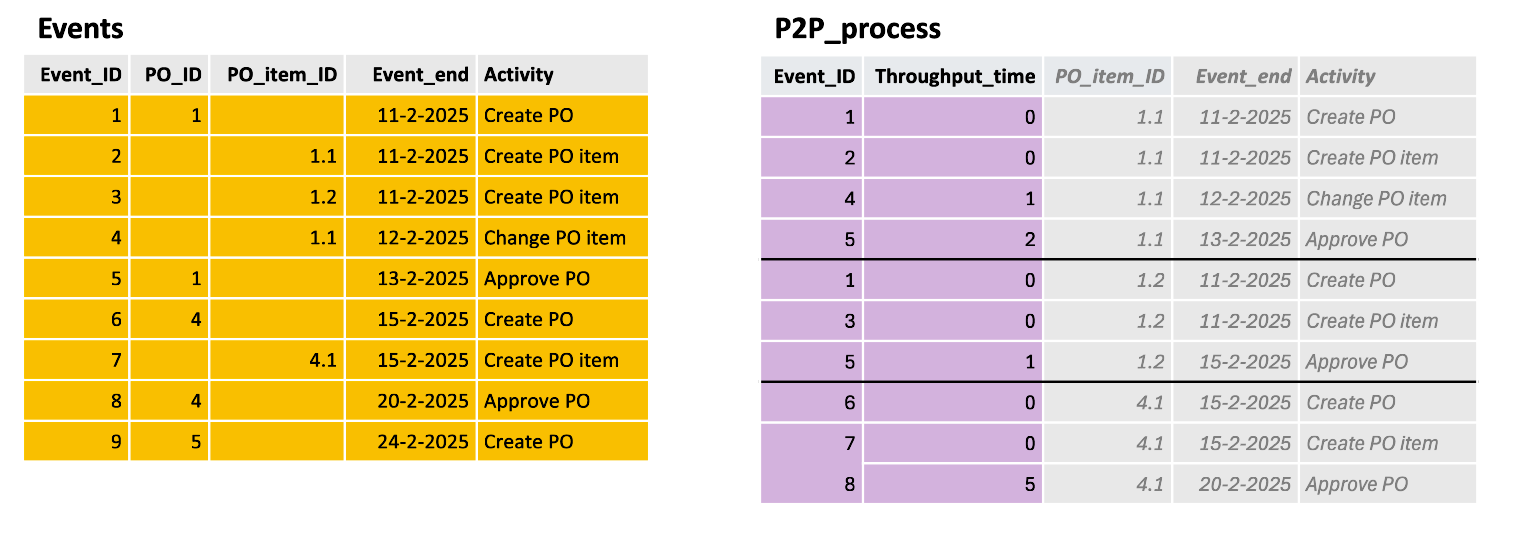
Process_event_ID, unique ID for each record in the process table.Event_ID, unique for each individual event, regardless of in which process it's used. In the example below,event_ID 1occurs twice in the process table.Throughput_time, time from previousEvent_endto the currentEvent_end.Cycle_time*, time fromEvent_starttoEvent_end.Cycle_timeis only available if the events have anEvent_startdefined.
The following illustration shows an example Process table containing the events for the P2P_process.
The following illustration shows an example Process table containing the high level events for the P2P_process as a result from filtering on the PO_events (PO_ID).

Tags table
The Tags table contains the tags data for all the tags in your dataset. Depending on your data model, one or more ID fields can be available in the Tags table. If your data model consists of multiple objects that each have an associated Tags table, these Tags tables are consolidated in a single Tags table in Data Manager.
Tag_IDTag_nameTag_type<Object>_ID
Due dates table
The Due dates table contains the due dates timestamps for all the due dates in your dataset. Depending on your data model, one or more ID fields can be available in the Due dates table. If your data model consists of multiple objects that each have an associated Due dates table, these Due dates tables are consolidated in a single Due dates table in Data Manager.
Due_date_IDDue_dateDue_date_typeActual_dateExpected_dateOn_timeCostDifference<Object>_ID
Required output tables
The information in this section is only applicable to apps that employ a single process, in other words, apps that were created before the release of multi-process Process Mining.
A data model must have a Cases, Event_log, Tags, and Due_dates table.
Depending on the app template, the Cases table has a process-specific name, for example, Purchase_order_items, or Incidents.
The Cases, Event_log, Tags, and Due_dates table must have the following output fields.
All the fields are required. However, some fields are allowed to contain only NULL values.
| Table | Required output field |
Cases | Case_ID* |
Event_log | Case_ID* |
Event_start | |
Event_end | |
Activity | |
Activity_order | |
Automated | |
Event_cost | |
Event_processing_time | |
Tags | Tag_ID |
Case_ID* | |
Tag | |
Tag_type | |
Due_dates | Case_ID* |
Due_date | |
Due_date_type | |
Actual_date | |
Expected_date | |
On_time | |
Cost | |
Difference |
*) Depending on the app template, Case_ID can be called differently, for example, Purchase_order_item_ID, or Incident_ID.
Viewing and editing the data model
Always make sure your data model adheres the requirements. Check out Data model requirements.
- Locate the Output section in Data transformations and select Data model to view the data model of your process app.
Check out Editing data transformations for more information on how to change the data model.
Validation checking
A notification is displayed if your data model does not meet the requirements.

Refer to Data model requirements for details.
Filtering types of tables
You can use the Filter options to display the selected types of tables in the data model.
Adding tables
Make sure there is an input table for the object you want to add and that the object is defined in models -> 2_objects in the Transformations section of Data transformations.
Follow these steps to add a table.
- Select + Add table. The Add table dialog is displayed.
- Select the type of table that you want to add from the Type list.
- Select the Table that defines the new output table.
- Select the Primary key for the new table.
- Define the additional properties for the table.
note
Depending on the type of the table, different properties may be requested.
- Add the relations for the table and select Add table.
Refer to Adding tables for more information on how to add a table in the transformations.
Additional properties for Events tables
It is advised to either have a separate Events table per activity or an Events table per object. For example, opportunity_create_events, and opportunity_approve_events, etc, or opportunity_events table.
The following table describes the properties you need to specifiy when adding an Events table.
| Property | Description | Mandatory Y/N |
Event_ID | The unique identifier of the event. | Y |
Activity | The field that contains name of the event. This describes the step in the process. | Y |
Event start | The fields that contains timestamp associated with the start of executing the event. | N |
Event end | The field that contains the timestamp associated with the end of executing the event. | Y |
User | The field that contains the user who executed the event. | N |
Automated | The field that contains indicates whether the event is manually executed or automated. | N |
Order | The field that contains the order of the events. | N |
Processing time | The field that contains the time for executing the event (in milliseconds). | N |
Event cost | The fields that contains the costs for executing the event. | N |
Parent event ID | The fields that is used to define a parent-child relationship between events, that can be used to create a structured process hierarchy. | N |
Make sure there is an input table for each event table and that the events are defined in models -> 3_events in the Transformations section of Data transformations.
Deleting a table
Follow these steps to delete a table.
- Select the table that you want to delete in the data model editor. The Edit table panel is displayed.
- Select Delete table. A confirmation message is displayed.
- Select Delete to continue.
The table and the relations are deleted from the data model.
Adding relations
Follow these steps to add a relation between two tables.
- Select the table that you want to relate to another table. The Edit table panel is displayed.
- In the Edit table panel, locate the Relations section.
- Select + Add new to create a new relation.
- Select the field that you want to use in this table from the Key list.
- Select the Table you want to connect to and select the field that use to connect from the Key list.
- Select Apply.
Deleting a relation
Follow these steps to delete a relation.
- Select the table for which you want to delete an outgoing relation. The Edit table panel is displayed.
- In the Edit table panel, locate the relation you want to delete and select Delete relation.
- Select Apply.
Changing the primary key for a table
Follow these steps to change the primary key for a table.
- Select the table for which you want to change the primary key. The Edit table panel is displayed.
- In the Edit table panel, locate the relation for which you want to change the primary key.
- Select the new field that is to be used as the Primary key to join the tables.
- Select Apply.
note
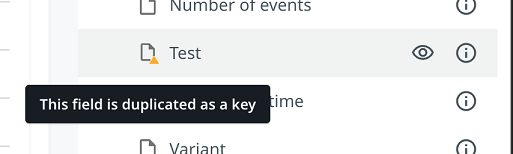
If you change the primary key, the field that you select as the new primary key is duplicated in the table. You can delete the original field in Data Manager.
 Primary keys can be set to
 null.
Making the updated data model available in dashboards
Follow these steps to make the changes to the data model available in dashboards.
- Select Save to save the data model.
- Select Apply to dashboards to run the transformations and make new the table available for use in dashboards.
note
This may take several minutes. If the run finishes successfully, the changes to the data model will show up in the Data Manager.
The Save option is only enabled, after you made any changes to the data model.
Preview panel
You can select a table to see the fields and the data contents in the Preview panel. The data preview enables you to check if the data looks as expected.
The Preview panel shows the data of the last data run in which this table was recalculated. If you have made recent changes, then start a new data run to view its results, refer to Editing data transformations.
Selecting visible columns
You can select the columns you want to display in the Preview panel.
Follow these steps to change the visible columns.
| Step | Action |
|---|---|
| 1 | Select Columns to display the list of columns. |
| 2 | Select the columns you want to display in the Preview panel from the list. |
Creating a custom data model
In some cases, you may want to add objects to an existing process app. For example, when you use a Custom process or Event log process app as a starting point and want to extend it with other objects. To achieve this, take the following steps.
- Add the SQL files for the new Object and Event_log to in the models section in Data transformations.
- Go to Data model and add tables for the Object and Event_log your data model.
- Add a dummy relation for the new tables to the existing data model.
- Go to Processes and add a new process related to the new Object.
- Delete the original process.
- Go to Data model and delete the
CasesandEvent_logtables. If applicable, delete theTagsandDue_datestables.