Cache generation
Introduction
In this guide, it is assumed there is only one environment.
Before an end user can access an environment and the release that is active on it, data needs to be acquired (e.g. queries on an external database) and calculations need to be cached. The result of a single such cache generation is called an ‘instance’.
Caches can be generated manually or automated. The result of these cache generations can be seen in the Superadmin Released data tab.
Generating caches manually
To create data instances, you must generate caches which are required to let the end users access the app.
Follow these steps to create a cache for your release.
| Step | Action |
|---|---|
| 1 | Go to the Superadmin Released data tab. |
| 2 | Click on Generate cache now. |
| 3 | Click on GENERATE CACHE. |
| 4 | When the dialog shows Finishedclick on CLOSE. |
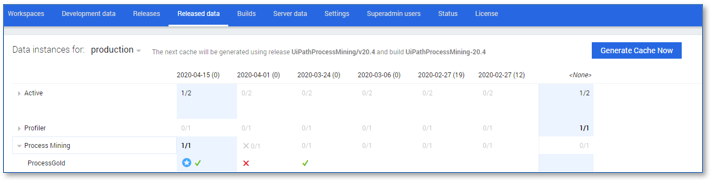
A new row has been added with your module name and a column for the datarun named after the current date, 1/1 is shown in this column indicating the instance was generated successfully.
If you click on the arrow to expand the row, you see your organization name and some icons in the row, indicating the data generation was successful and this data instance is now active. See illustration below.
Generating caches automatically
Cache generation can also be done periodically (e.g., daily) instead of manually. This is useful when data is queried from an external database, as it will make updated data available for end users automatically.
To set this up, administrator access to the server is needed.
It is possible to generate caches for specific modules in the active release. Use app=MODULECODE instead of app=* in the batch file (see below). If app=* is used, caches are generated for all modules in the active release.
It is also possible to generate caches for specific organizations. Use o=[org] to generate a cache for the specified organization. If o=* is used, caches are generated for all organization in sequential order.
This is only applicable for apps that do not use a connector to generate input data.
Follow these steps to schedule a task to generate caches.
| Step | Action |
|---|---|
| 1 | Open the directory PLATFORMDIR. |
| 2 | Create an empty batch file, e.g.: generatecaches.bat. |
| 3 | Edit this batch file, and use the following line as content: call builds/processgold.bat -DataServer -ccdb app=* o=org refreshmvncaches=both This batch file will generate caches for all applications. |
| 4 | Schedule a task in Windows to call this batch file. |
A scheduled task will run periodically to generate caches for all projects for that installation of UiPath Process Mining.
It is recommended to run this task outside of office hours to have as little impact as possible on your users.
Interpreting results
The released data view contains the data instances generated for each module.
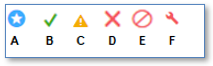
Below is a description of the icons indicating the state of an instance.
| Icon | Description |
|---|---|
| A | The currently active data instance. |
| B | A valid data instance. |
| C | A valid data instance, but with warnings. |
| D | A failed data instance. |
| E | A valid, but blocked data instance. |
| F | A failed but marked as fixed data instance. |
When a new data instance is created, it will automatically be set to active if it is valid. However, if it has failed, the last valid instance will remain active instead.
Viewing the detailed log of data instance generation
Sometimes, it is necessary to look at a more detailed log of the data instance generation. For example, when an error or warning occurred, and you want to see more details.
Follow these steps to view the log of a data instance generation.
| Step | Action |
|---|---|
| 1 | Go to the Superadmin Released data tab. |
| 2 | Right click on the data instance you want to view the log of and select Show log. (optional: Select the modules to use, see ‘the Select Instances dialog’) |
| 3 | Click on OK. |
The log of the data instance generation is shown.
Opening an instance
Follow these steps to view a specific data instance.
| Step | Action |
|---|---|
| 1 | Go to the Superadmin Released data tab. |
| 2 | Right click on the data instance you want to open and select Open.... |
| 3 | Click on OPEN. |
The project is opened using the data instance you selected.
Overriding instance status
Blocking a data instance
Sometimes, an instance that is considered valid can still contain a problem. In this case, it is possible to block it to ensure it will be deactivated and end users cannot access it anymore.
Follow these steps to roll back an active cache.
| Step | Action |
|---|---|
| 1 | Go to the Superadmin Released data tab. |
| 2 | Right click on the data instance on which the issue is detected and select Mark blocked. (optional: Select the modules to use, see ‘the Select Instances dialog’) |
| 3 | Click on OK. (2x) |
The active data instance has been marked as blocked. The currently active data instance is the last data instance which was valid.
Marking a data instance as fixed
When an issue with a blocked or failed data instance is not actually a problem, it is possible to mark it as fixed and reactivate it.
Follow these steps to mark a data instance as fixed.
| Step | Action |
|---|---|
| 1 | Go to the Superadmin Released data tab. |
| 2 | Right click on the data instance on which have been fixed and select Mark fixed. (optional: Select the modules to use, see ‘the Select Instances dialog’) |
| 3 | Click on OK. (2x) |
The active data instance has been marked as valid and the currently active data instance is set to the latest valid data instance.
The Select Instances dialog
When using the context menu (right-click on an instance) in the Released data tab, each of the options opens a dialog named Select Instances. See illustration below.
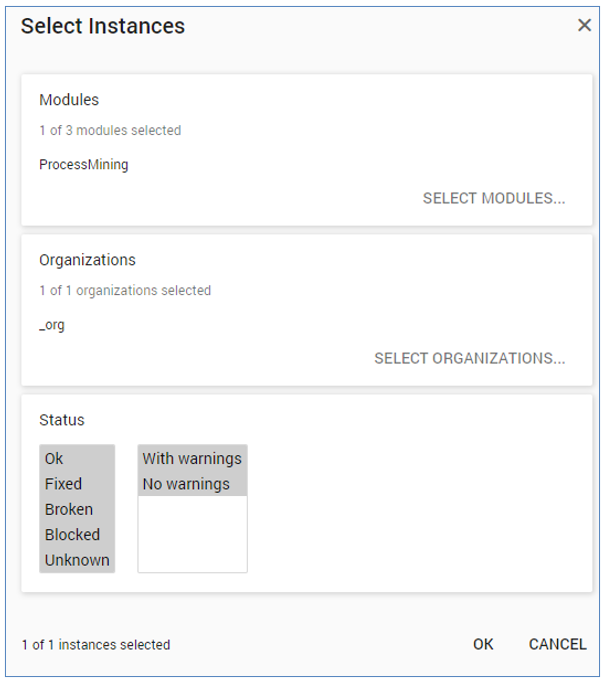
In this dialog, you have the option to select the modules on which the selected operation is applied. Some actions, like Open, require a single instance to be selected, while others allow multiple to be selected, like Show Logs. Depending on where you right-click in the grid, different modules will be initially selected in the Select Instances dialog.
Follow these steps to select specific modules for the current action you are executing.
| Step | Action |
|---|---|
| 1 | Go to the Superadmin Released data tab. |
| 2 | Right click on the data instance and select any of the options. |
| 3 | Click on SELECT MODULES. |
| 4 | Select the modules you want to use. |
| 5 | Click on OK. |
The modules you have selected are indicated in the Select Instances dialog.
Rollback settings
Older instances will be automatically deleted when new ones are created. By default, only the last data instance with an error and the last two valid data instances will be kept available.
It is possible to increase these numbers to whatever suits best. Additionally, when a valid instance is created, all invalid instances more than a week older will be deleted.
Follow these steps to adapt the rollback settings.
| Step | Action |
|---|---|
| 1 | Go to the Superadmin Settings tab. |
| 2 | In the Server Settings text field, set KeepInstancesError to the number of error instances you wish to keep (e.g. “KeepInstancesError”: 2). |
| 3 | In the Server Settings text field, set KeepInstancesOk to the number of valid instances you wish to keep (e.g. “KeepInstancesOk”: 6) |
| 4 | Click on SAVE. |
The amount of valid data instances and error instances kept is updated to the settings that were chosen. The next time an instance is generated these new settings will be used to delete old instances.
Automated failure emails
It is possible to receive emails when your cache generation fails.
Follow these steps to set up automated failure emails.
| Step | Action |
|---|---|
| 1 | Go to the Superadmin Settings tab. |
| 2 | In the Server Settings text field, set SendMailReportTo to the email you wish to receive emails on failure. (e.g. "SendMailReportTo": "[email]"). (Optional) In server settings text field, set SendMailReportId to a string that identifies your server. This will be added to the subject line of the email. (e.g. "SendMailReportId": "[id]"). |
| 3 | Click on SAVE. |
Upon failure, an email will be sent to the email that was set in SendMailReportTo, with SendMailReportId in the subject line.
Exporting datasets for developers
You can export the data contained in an instance as a development dataset. Developers can use these datasets, so they do not need to acquire data (e.g. by running queries) themselves.
Follow these steps to export a dataset for development.
| Step | Action |
|---|---|
| 1 | Go to the Superadmin Released data tab. |
| 2 | Right click on the data instance you want to export and select Export data to development…. (optional: Select the modules to use, see ‘the Select Instances dialog’) |
| 3 | Click on OK. |
| 4 | Enter a name for the exported dataset and click on OK. |
The exported dataset is added to the datasets in the Development data tab.
Related information
For more explanation about multiple environments see: Environments.